Transforming Car Images with ComfyUI: Advanced Workflow for Seamless Background & Angle Changes
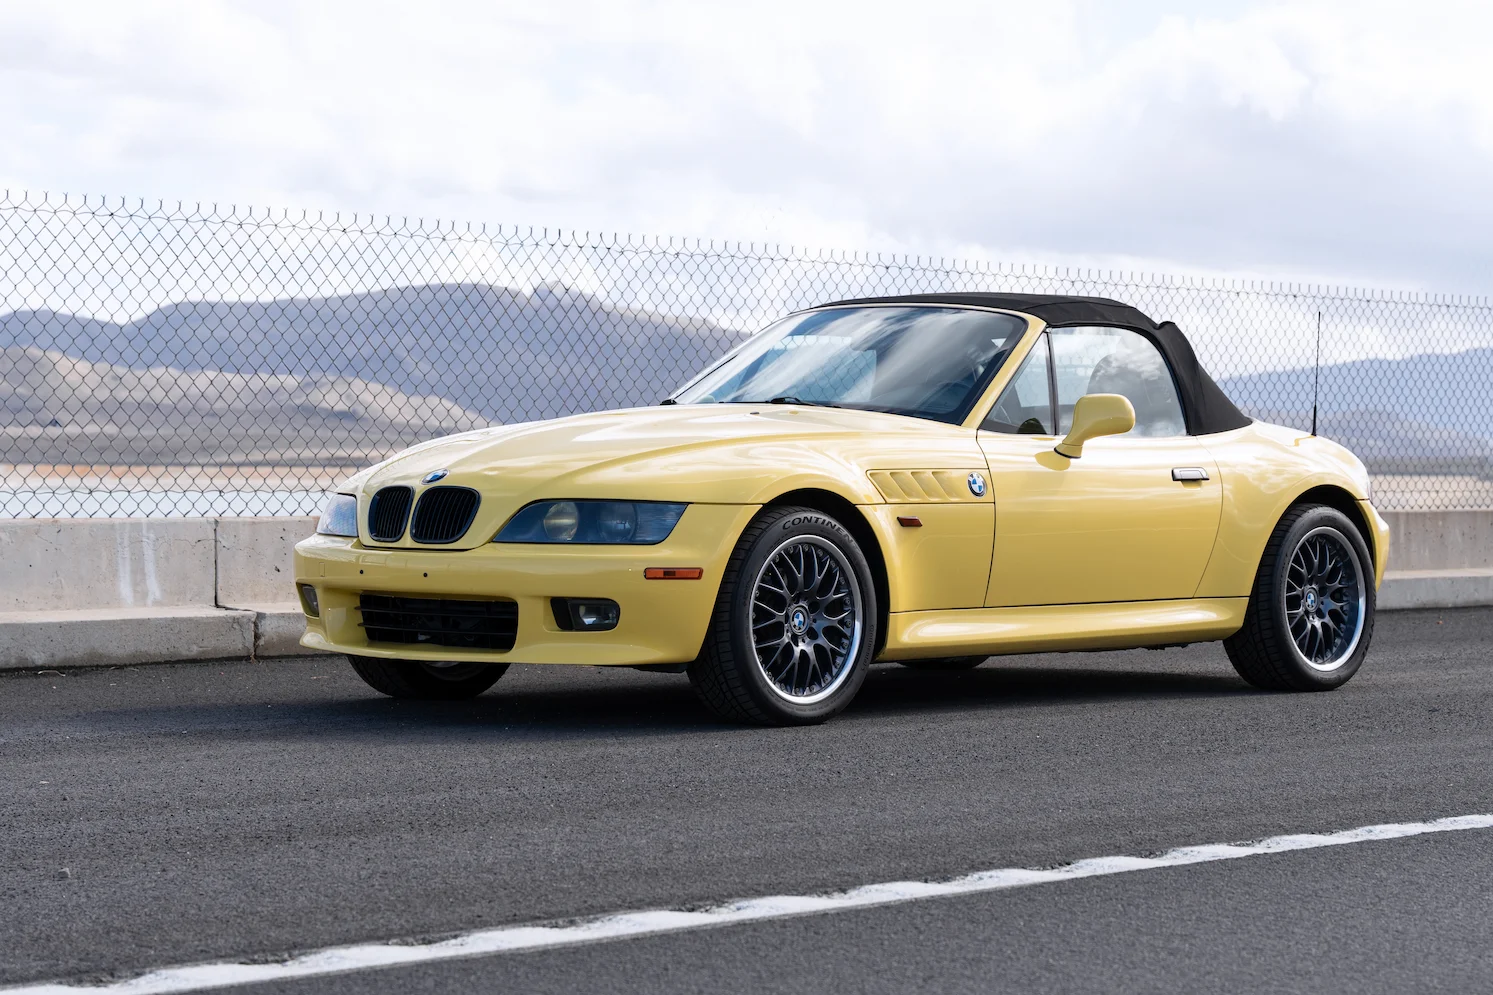
In today’s digital landscape, the ability to reimagine product visuals is a game-changer, especially in automotive marketing, e-commerce, creative advertising, and even AI training data generation. In this guide, I’ll walk you through a specialized ComfyUI workflow that takes a car image, preserves its physical features, and seamlessly changes its background and camera angle, blending it naturally into a new environment.
Why This Workflow?
Whether you’re building marketing assets, concept art, or synthetic datasets, maintaining the integrity of the car’s details while changing its context is crucial. This workflow ensures that subtle features, like vents, lights, are retained, resulting in photorealistic, high-quality outputs.
Prerequisites: Setting Up Your Models
Before diving in, make sure your ComfyUI environment is ready:
Model Placement:
Place your required checkpoint models in the models/checkpoints directory.
For photorealistic results, I recommend using the “Realistic Vision” model (e.g., realVisXL-v4).
If you want a more stylized or animated look, try the “DreamShaper” model.
IPAdapter Models:
Place your IPAdapter models in the appropriate models/ipadapter directory.
Use the IPAdapter Unified Loader node in ComfyUI to select and load these models.
Segmentation Models:
Most segmentation models (like sam_vit_h and GroundingDINO_SwinT_OGC) are included when you install the node pack, but if not, you’ll need to add them manually.
Also, be sure to download the vitmatte models and place them in models/vitmatte from
Workflow Breakdown: Node-by-Node
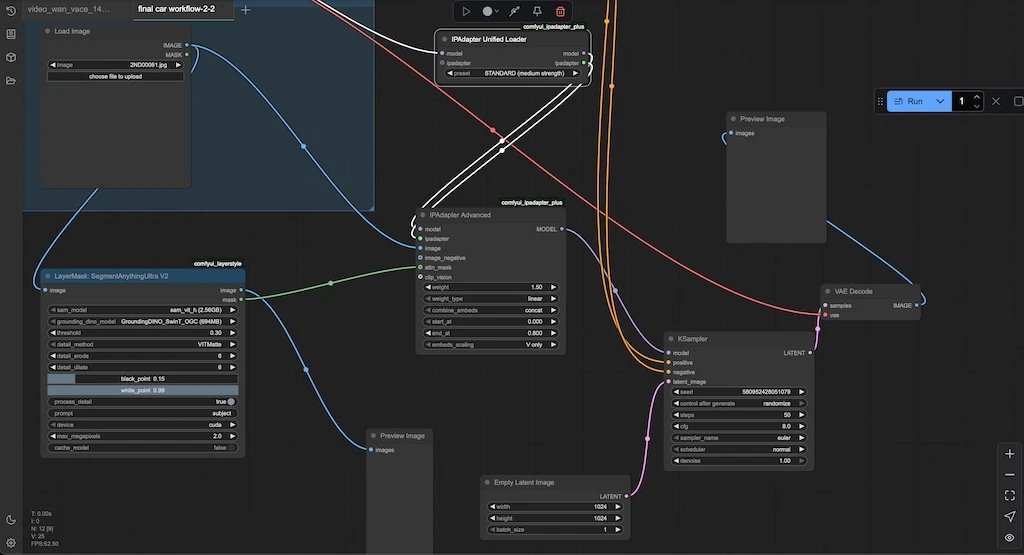
This workflow uses a series of interconnected nodes to achieve high-quality, context-aware car image transformation:
Checkpoint Loader Simple
Loads your main model checkpoint. Outputs the MODEL, CLIP, and VAE needed for the rest of the workflow.
IP Adapter Unified Loader
Take the loaded MODEL and apply your chosen IP Adapter model and preset (e.g., "STANDARD (medium strength)"). Outputs both the adapted model and the IP Adapter.
LayerMask: Segment AnythingUltra V2
Input your car image here.
Uses advanced segmentation to create a precise mask, isolating the car from the background while preserving fine details (vents, lights, mirrors, etc.).
Outputs both the masked image and the mask.
Customize settings like threshold, detail method, and device (e.g., "cuda") for optimal results.
Preview Image
Visually inspect the segmentation mask to ensure the car is accurately isolated before proceeding.
IP Adapter Advanced
Integrates the adapted model, IP Adapter, original image, and the segmentation mask.
Ensures the car’s features are preserved and guides the blending into the new environment.
Empty Latent Image
Defines the canvas for your output (e.g., 1024x1024 resolution, batch size 1).
Provides the latent space for the KSampler to work on.
KSampler
The core sampling node that generates the new image.
Take the model, positive and negative conditioning (from your prompts), the latent image, and other parameters (seed, steps, sampler type, etc.).
Produces the final latent representation for decoding.
VAEDecode
Decodes the latent output from the KSampler using the VAE from your checkpoint loader.
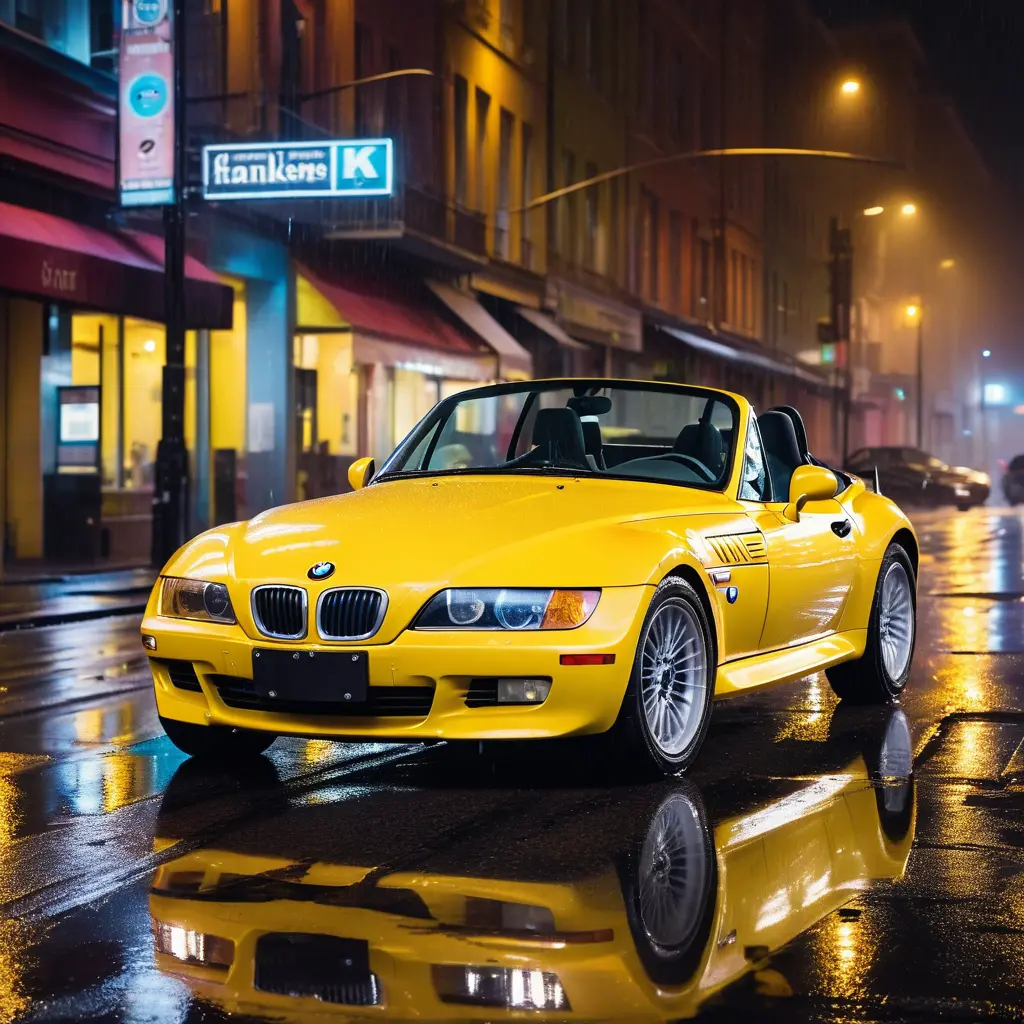
Produces the final, photorealistic image with the car seamlessly integrated into the new background and angle.
Prompt Engineering: The Secret to Realism
The quality of your output depends heavily on your prompt. Avoid generic prompts like “a car on a street”, these often miss important details. Instead, craft a highly detailed prompt describing the car, its color, lighting, reflections, and the desired background. Tools like ChatGPT or Gemini can help generate rich, descriptive prompts.
Positive Prompt:
Describe exactly what you want (e.g., “A red sports car with chrome rims, parked on a sunlit mountain road, realistic reflections on the bodywork…”).
Negative Prompt:
List what you want to avoid (e.g., “No distortions, no cartoon effects, no background clutter…”).
Pro Tips for Best Results
Prompt Detail: The more specific your prompt, the better the output, don’t hesitate to use AI tools for prompt generation (or you can use Llama/llava nodes for generation of prompt if you want to try something new).
Model & Adapter Selection: Experiment with different checkpoints and IP Adapter presets for varied effects.
Parameter Tuning: Adjust segmentation and sampling parameters (like threshold, steps, and sampler type) to refine output quality.
Applications
Automotive Advertising: Create localized campaign visuals without reshoots.
Concept Prototyping: Visualize vehicles in different contexts quickly.
Data Augmentation: Feed realistic synthetic data into CV models.
Virtual Showrooms: Render consistent catalog backgrounds for e-commerce.
Conclusion
With this workflow, you can effortlessly create high-quality, contextually rich car images for a variety of applications. By focusing on precise masking, detailed prompts, and the right model setup, you’ll achieve results that are both visually stunning and true to the original vehicle.
Want to enhance your visual content with advanced workflows? Let’s talk!