Training your own LoRa
We have done efficient LoRA training using three popular frameworks—kohya-ss/sd‑scripts, Ostris AI‑Toolkit, and ComfyUI’s FluxTrainer nodes. It covers concept, environment setup, dataset preparation with BLIP‑2 captioning, detailed walkthroughs of each toolchain (including your kohya‑ss steps), infrastructure on Runpod, and best practices for mixed‑precision, caching, and scheduling.
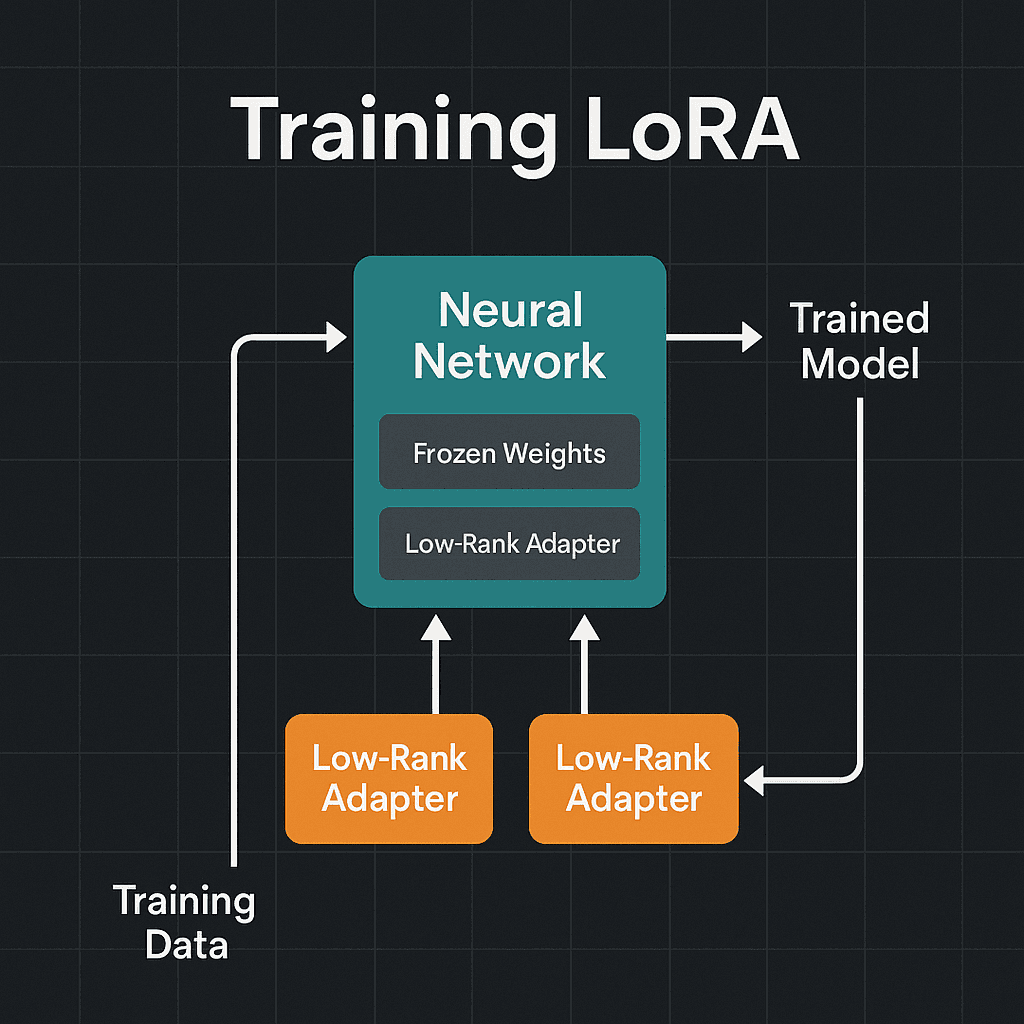
What Is LoRA?
Low‑Rank Adaptation (LoRA) is a fine‑tuning technique that injects small, trainable low‑rank matrices (the “adapters”) into selected weight layers of a large pre‑trained model, while freezing the original weights. By optimizing only these adapters, LoRA achieves:
Parameter Efficiency: Only a chunk of new parameters is learned per layer instead of the full model.
Memory Savings: Reduced trainable footprint enables mixed‑precision and 8‑bit optimizers even on mid‑range GPUs.
Faster Convergence: Smaller parameter set means fewer gradients to compute and update.
Why Three Frameworks?
Each of the following toolchains offers unique strengths when training LoRA adapters on Stable Diffusion backbones:
kohya‑ss / sd‑scripts
Scriptable CLI & GUI: Extensive flags for optimizer choice (AdamW8bit, Adafactor), caching, checkpointing, and scheduling.
TOML‑driven Dataset: Fine control over resolution buckets, shuffling, and caption extensions.
Ostris AI‑Toolkit
YAML Job Specs: One file describes the entire pipeline—model, optimizer, layers to adapt, sampling procedure, and EMA.
Built‑in Performance Logs: Automated logging, checkpoint rotation, and flowmatch noise scheduling for sharper results.
ComfyUI FluxTrainer Nodes
Visual Node Graph: Drag‑and‑drop building blocks for model loading, adapter injection, data pipelines, and saving.
Low‑VRAM Mode: Optimized attention and BF16 support for training on 10–12 GB cards without scripting.
Dataset Preparation & Captioning
Download, Collect or Scrape the images in a folder, all images should reflect what you want your LoRa to be trained on, for example we can collect 5-20 different images of a person to train a LoRa on him/her. Then the second step is captioning which is the most important one.
BLIP‑2 Captioning
We leveraged Salesforce’s BLIP‑2 (blip2-opt-2.7b-coco) for automatic captions—state‑of‑the‑art on COCO (+2.8 CIDEr) (Hugging Face). Dynamic extension filtering and .txt outputs align with sd‑scripts requirements. Just wrote a basic script to read images, add caption and format according to the dataset format as required by kohya-ss
kohya‑ss Walkthrough
This section details how to set up a reproducible Python environment for LoRA training with kohya‑ss’s SD‑Scripts (sd3 branch) and install all necessary dependencies—accelerate, bitsandbytes, xformers, PyTorch for CUDA 12.4, OpenCV‑Python, and Hugging Face Diffusers—along with optional TMUX for session management. By following these steps, you’ll isolate your project in a virtual environment, ensure compatibility with your GPU drivers, and leverage mixed‑precision and 8‑bit optimizers to maximize VRAM efficiency during training.
Environment Setup & Dependency Installation
Clone the SD‑Scripts repository and check out the sd3 branch.git clone https://github.com/kohya-ss/sd-scripts.git
cd sd-scripts
git checkout sd3
This pulls the kohya‑ss sd‑scripts code and switches to the sd3 branch, where Flux and Stable Diffusion 3 support reside (GitHub)
Create a Python virtual environment using venv.
python3.10 -m venv venv
The venv module creates an isolated environment so installed packages don’t conflict with the system Python.
Activate the new environment.
source venv/bin/activate
Activation ensures subsequent pip installs target only this venv and not your global site‑packages.
Upgrade pip to the latest version.
pip install --upgrade pip
Keeping pip up to date avoids installer bugs and ensures compatibility with newer wheel formats.
Install the core requirements from the repository.
pip install -r requirements.txt
This brings in SD‑Scripts dependencies such as transformers, tqdm, and safetensors as specified by the project (GitHub).
Install accelerate and bitsandbytes.
pip install accelerate bitsandbytes
accelerate handles mixed‑precision and distributed setups, while bitsandbytes provides 8‑bit AdamW optimizers for reduced VRAM usage.
Install xformers for memory‑efficient attention.
pip install xformers
XFormers accelerates Transformer attention kernels, significantly lowering GPU memory during training.
Install PyTorch matching CUDA 12.4.
pip install torch==2.4.1 torchvision --index-url https://download.pytorch.org/whl/cu124
Installing the specific PyTorch build for CUDA 12.4 ensures full GPU acceleration and compatibility with other libraries
Install OpenCV‑Python.
pip install --upgrade opencv-python
OpenCV supports image I/O and preprocessing tasks integral to dataset loading in SD‑Scripts.
Install Hugging Face Diffusers with PyTorch extras.
pip install --upgrade diffusers[torch]
This provides the Diffusers library optimized for PyTorch backends, enabling model and scheduler utilities.
(Optional) Install tmux for long‑running sessions.
sudo apt update && sudo apt install tmux -y
TMUX lets you detach and reattach to remote training sessions without interruption citeturn1search2.
Model & Encoder Downloads
Set your Hugging Face token.
The HF_TOKEN environment variable allows authenticated access to private or gated repositories via the CLI(huggingface.co)
Download the Flux base model and autoencoder.
This command fetches the FLUX.1‑dev model checkpoints and their associated autoencoder for downstream LoRA training (huggingface.co)
Prepare the
sd3directory and download text encoders.
The CLIP L and T5 XXL FP16 text encoders provide the text conditioning backbones aligned with SD Scripts v3 configuration.
Dataset Preparation & Captioning
Scraping & Organizing Images
Collect and place all training images under
my_lora_dataset/Images.Ensure one folder per LoRA project, with consistent naming and file formats (JPEG, PNG).
Then run the caption script as given above.
Training Execution & Flags for kohya‑ss
LoRA on U-Net Only
accelerate launchorchestrates the distributed run across CPUs/GPUs using youraccelerateconfig.--mixed_precision bf16reduces memory usage by using BF16 for model weights & gradients.--network_module networks.lora_fluxpoints to the LoRA implementation in the codebase.--network_dim 8sets the low-rank adapter dimension (r=8).--network_train_unet_onlyrestricts training to U-Net layers, leaving the text encoder frozen.Caching flags (
cache_text_encoder_outputs, etc.) offload heavy tensors to disk between steps, reducing VRAM pressure.--gradient_checkpointingsplits computation to trade extra compute for lower memory.
Full Fine‑Tuning (Flux‑FT)
--optimizer_type Adafactoruses a lower-memory alternative to AdamW.--full_bf16enables full BF16 precision for all layers.--fused_backward_passaccelerates gradient computation using fused kernels.--blocks_to_swap 8designates swapping deeper blocks to selectively fine-tune additional layers beyond LoRA.
Resuming & Checkpointing
To resume from an existing checkpoint:
Use --resume flag and ensure output_dir has previous checkpoints. SD‑Scripts will find the latest .pth or .safetensors file and continue training.
Unused/Optional Flags
--cache_text_encoder_outputs_to_disk: cache encoder outputs to disk.--cache_latents_to_disk: cache U-Net latents.--cache_text_encoder_outputs: keep encoder outputs in RAM.--max_data_loader_n_workers: number of worker threads.--save_precision: model save precision (fp16/bf16).--sdpa: enables Flash attention if available.
For training a LoRa for 75k steps, it took me approx 27 days on a 48 GB VRAM GPU device and 3-4 days on B200 with 200 GB VRAM, so have patience.
Ostris AI‑Toolkit Walkthrough
Ostris AI‑Toolkit is a comprehensive, YAML‑driven suite for diffusion model fine‑tuning—LoRA included—designed to run efficiently on consumer GPUs and integrate seamlessly with cloud deployments like Runpod (GitHub).
YAML Job Configuration
Define your entire pipeline in one Job.yaml (or similar) file:
sd_trainerorchestrates adapter injection, training, and checkpointing in one process.only_if_containslets you target specific transformer layers for adapter insertion, reducing compute overhead.save.max_step_saves_to_keepprevents S3 overload by pruning older checkpoints.
Runpod Serverless Deployment
Ostris integrates with Runpod’s serverless framework via a Docker image and a handler script:
Dockerfile based on
nvidia/cuda:11.8.0-base-ubuntu22.04installs Python 3.10, Git, FFmpeg, thenpip install torch runpodand toolkit requirements (YouTube).rp_handler.pyreceives job inputs (datasetURL,config_url,config_name), configures AWS env vars, and callsgetDatasetAndRun.shto pull data and launch training. (GitHub)
Shell Script Orchestration (getDatasetAndRun.sh)
Dataset Download & Extraction:
Automatically handles single‑folder or multi‑folder zips.
Config Retrieval:
Optional Diffusers Reinstall:
Checkpoint Sync to S3:
Ensures intermediate .safetensors are backed up in real time.
Key Parameters & Best Practices
dtype: bf16andcache_latents_to_diskslash VRAM usage on 10–16 GB cards. (Replicate)noise_scheduler: flowmatchyields sharper denoising trajectories by adaptively balancing noise steps. (GitHub)EMA (
ema_decay: 0.9999) stabilizes adapter weights over long runs.Checkpoint Pruning via
max_step_saves_to_keepprevents S3 flooding.
Resume & Monitoring
Automated Logging:
performance_log_everyoutputs loss metrics every N steps to console/S3.Checkpoint Resume: Re-run with the same YAML; AI‑Toolkit auto‑detects the latest checkpoint in
/workspace/outputs/and continues.Real‑Time Dashboard: Use Runpod’s UI or
aws s3 syncto fetch logs and checkpoints locally for monitoring.
This standalone section delivers everything needed to configure, deploy, and manage LoRA training with Ostris AI‑Toolkit.
ComfyUI FluxTrainer Nodes
ComfyUI’s FluxTrainer nodes embed LoRA training directly into the ComfyUI visual workflow, enabling users to fine‑tune Stable Diffusion adapters without leaving the UI (GitHub, RunComfy).
Key Features
Low‑VRAM Training (10–12 GB): FluxTrainer leverages optimized attention kernels and BF16 precision to run on consumer GPUs with as little as 10 GB of VRAM.
Seamless UI Integration: Training is performed via draggable nodes—no separate scripts—so you can build, modify, and compare workflows entirely within ComfyUI (RunComfy).
Kohya‑SS Backend Parity: Under the hood, FluxTrainer wraps kohya‑ss’s sd‑scripts, ensuring feature parity (caching, mixed precision, schedulers) with CLI methods.
Layer‑Specific Adapter Injection: The
InitFluxLoRATrainingnode allows you to target specific transformer blocks (e.g., blocks 2 & 7) for adapter placement, conserving compute.
Workflow Setup
Install FluxTrainer Nodes:
Clone the ComfyUI-FluxTrainer repo into yourcustom_nodesfolder or install via ComfyUI Manager (GitHub).Load an Example Workflow:
Import theflux_lora_train_example_01.jsonworkflow to get starter nodes pre‑configured (Reddit).Configure Dataset Nodes:
UseTrainDatasetGeneralConfigandTrainDatasetAddnodes to point at your prepared image folder (with optional captions) (RunComfy).Initialize Training:
Wire up theInitFluxLoRATrainingnode with model checkpoints (transformer, VAE, CLIP_L, T5), set adapter rank (r) and α, and define epochs—mirroring kohya‑ss flags (YouTube).Execute Training: Click Queue in ComfyUI to start the training loop; monitor VRAM usage and console logs in real time within the UI (YouTube).
Dataset Generation Use Case
We have used this in cases where we generated the dataset using a ComfyUI workflow (e.g., the famous Flux Kontext pipeline) to create 20 variations of a person, then trained a LoRA on that dataset (YouTube). The original workflow was made by Lovis Odin.
Practical Tips
Enable
split_mode=true: If your system RAM is limited (<32 GB), splitting tensors across CPU/GPU prevents out‑of‑memory errors.Cloud Deployment via ComfyAI.run: Run ComfyUI workflows on scalable infrastructure for faster throughput and higher VRAM options.
Resume Training Automatically: Re‑run the same workflow; FluxTrainer auto‑detects existing checkpoints and continues from the last saved epoch.
Conclusion
Each framework offers unique strengths:
kohya‑ss for scriptable, deeply configurable pipelines;
Ostris for consumer‑grade GUI/CLI ease and targeted layer control;
ComfyUI FluxTrainer for seamless low‑VRAM, visual experimentation.
When VRAM is ample (>24 GB), kohya‑ss’s full scripting and advanced flags shine. For budget GPUs or rapid visuals, ComfyUI’s FluxTrainer is unbeatable. Ostris AI‑Toolkit sits in the middle, giving CLI simplicity plus YAML‑driven specificity.
Not able to decide which option is better for you? Let's talk and figure that out together.